

What does exposure entail in photography, and how can you manipulate your exposure parameters to craft striking and intricately detailed photographs?
In this article, we’ll delve into the world of photography exposure, exploring what it means and how to manipulate exposure settings to create exquisite, finely-detailed photographs. We’ll embark on an exposure photography crash course, starting with the fundamentals, including key concepts like aperture, shutter speed, and ISO. Along the way, I’ll provide practical examples tailored for various photography scenarios, such as landscapes, portraits, and more.
By the time you reach the end of this article, you’ll possess the knowledge and skills needed to expertly fine-tune your camera settings for flawless exposure results, empowering you to capture breathtaking images with confidence.
Let’s dive right in.
What is Exposure in Photography?
At its core, exposure in photography refers to the amount of light that enters the camera and interacts with the camera’s sensor (or film, in traditional photography) to create an image. It’s a delicate dance between light and technology, where the photographer’s skill lies in achieving the perfect balance.
Think of exposure as the recipe for a photograph. Just as a chef combines various ingredients in precise quantities to create a delicious dish, a photographer blends the elements of exposure to produce a visually pleasing image. Adjusting these elements can dramatically change the look and feel of a photo, allowing for creative expression.
The Exposure Triangle
To grasp exposure fully, it’s crucial to understand the three primary elements that form the foundation of exposure—aperture, shutter speed, and ISO. These three factors make up what photographers commonly refer to as the “exposure triangle.”
Aperture
Aperture is the opening within the lens through which light passes into the camera. It’s often represented by an f-number, such as f/1.4, f/2.8, or f/16. A lower f-number corresponds to a wider aperture, allowing more light to enter, while a higher f-number represents a narrower aperture, permitting less light.
Aperture also affects depth of field. A wide aperture (e.g., f/1.4) creates a shallow depth of field, resulting in a blurred background, commonly known as bokeh, while a narrow aperture (e.g., f/16) produces a deep depth of field, keeping more of the image in focus.
Shutter Speed
Shutter speed determines the duration for which the camera’s sensor is exposed to light. It is measured in seconds or fractions of a second, such as 1/1000s, 1/250s, or 1/30s. Fast shutter speeds (e.g., 1/1000s) capture fast-moving subjects crisply, reducing motion blur. In contrast, slow shutter speeds (e.g., 1/30s) can create artistic effects by capturing motion or producing long-exposure shots.
Shutter speed also plays a crucial role in controlling exposure, as it directly affects how much light reaches the camera’s sensor during the exposure process.
ISO

ISO, which stands for the International Organization for Standardization, is a measure of the camera sensor’s sensitivity to light. Lower ISO values (e.g., ISO 100) indicate low sensitivity and are ideal for well-lit conditions, resulting in images with minimal noise (grain). Higher ISO values (e.g., ISO 1600 or higher) increase sensor sensitivity, making them useful in low-light situations but potentially introducing noise to the image.
Adjusting the ISO allows photographers to capture images in challenging lighting conditions while maintaining proper exposure.
Measuring Exposure: The Histogram
To ensure accurate exposure, photographers often rely on a tool called the histogram. A histogram is a graphical representation of the distribution of light and dark tones in an image. It displays the tonal range from black (left) to white (right), with mid-tones in the center.
Understanding the histogram enables photographers to assess whether an image is properly exposed. A well-exposed image typically features a histogram with a balanced distribution of tones, avoiding significant spikes at either extreme. Overexposed images show a histogram shifted to the right, while underexposed images display a histogram skewed to the left.
The Importance of Proper Exposure
Why does exposure matter so much in photography? Proper exposure is essential because it directly influences the image’s quality. Here’s why it’s crucial:
- Detail: Proper exposure ensures that you capture all the necessary details in your shot, from highlights to shadows. Overexposure can lead to blown-out highlights, while underexposure results in lost shadow details.
- Color Accuracy: Accurate exposure helps maintain the true colors of your subject. Under or overexposing an image can affect color saturation and accuracy.
- Noise Control: Exposure impacts the amount of noise (graininess) in your photos. Overexposed images tend to have more noise in the highlights, while underexposed images have increased noise in the shadows.
- Creative Control: Controlling exposure allows photographers to achieve various creative effects, such as motion blur, long-exposure shots, or shallow depth of field with pleasing bokeh.
- Storytelling: Exposure can convey mood and emotion in a photograph. Properly exposed images can tell a compelling visual story.
Creative Use of Exposure
While proper exposure ensures accurate and technically sound photographs, creative photographers often push the boundaries of exposure to produce unique and artistic results. Here are some creative ways exposure can be used:
- Silhouettes: Underexposing the subject while maintaining proper exposure for the background can create striking silhouettes.
- High-Key and Low-Key Photography: High-key images have predominantly bright tones, while low-key images feature mainly dark tones. Manipulating exposure settings helps achieve these effects.
- Light Painting: Long-exposure shots in low light enable light painting, where photographers use light sources to “paint” on the scene during the exposure.
Common Exposure Scenarios
Different photography scenarios require adjustments to exposure settings to achieve the best results. Let’s explore a few common scenarios:
Landscape Photography
Landscape photographers often aim for deep depth of field to keep everything in focus. They typically use narrow apertures (higher f-numbers) and low ISO values. Shutter speed varies depending on the desired effect, such as capturing moving water with a slower shutter speed.
Portrait Photography
Portrait photographers often opt for a wide aperture (lower f-number) to create a pleasing background blur (bokeh) that isolates the subject. Shutter speed is adjusted to freeze any motion or create a specific effect, and ISO is set for optimal image quality.
Low-Light Photography
In low-light situations, photographers may need to increase ISO to boost sensitivity while carefully managing aperture and shutter speed to maintain proper exposure without introducing excessive noise.
Mastering Exposure: Tips and Techniques
Achieving perfect exposure may require some practice and experimentation. Here are a few tips and techniques to help you master exposure:
Bracketing
Bracketing involves taking multiple shots of the same scene at different exposure settings. This technique ensures that at least one of the shots captures the ideal exposure, especially in challenging lighting conditions.
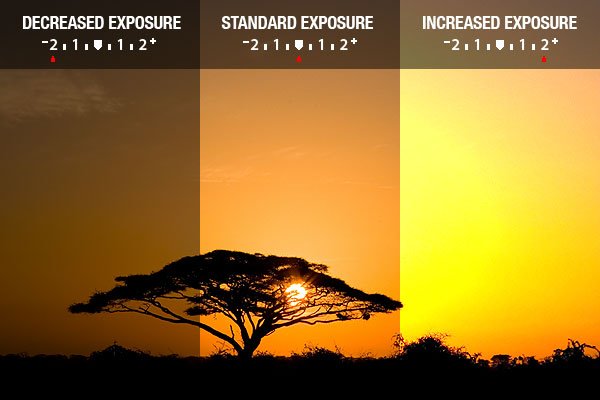
Exposure Compensation
Exposure compensation allows you to manually adjust exposure settings to make an image brighter or darker than what the camera’s metering suggests. This is useful when you want to override the camera’s automatic settings for creative or challenging lighting situations.
Manual Mode
Switching to manual mode gives you full control over aperture, shutter speed, and ISO. While it may seem daunting, manual mode allows for complete creative freedom and precise exposure control.
Exposure in Post-Processing
Even with meticulous attention to exposure during shooting, post-processing plays a significant role in fine-tuning exposure. Software tools like Adobe Lightroom and Photoshop provide the means to adjust exposure, highlights, shadows, and contrast to achieve the desired look.
The Bottom Line
Exposure in photography is the foundation upon which captivating images are built. It’s a delicate interplay of aperture, shutter speed, and ISO, each contributing to the visual storytelling process. Understanding exposure and how to manipulate it is an essential skill for photographers of all levels, from beginners to seasoned professionals.
As you embark on your photographic journey, remember that mastering exposure takes time and practice. Experiment with different scenarios, study your camera’s histogram, and refine your techniques. In doing so, you’ll unlock the full creative potential of your photography, producing images that truly resonate with your artistic vision.

